Updated April 28, 2025 11:56AM
How to Toprope Belay
Get the safest method and helpful tips for giving the best toprope belay, whether you're using an ATC or a grigri.
"None"
Belaying a climber on toprope—where the rope runs from the belay device up through an anchor at the top of the climb and back down to the climber’s harness—is as straightforward as it gets. The climber doesn’t have to clip bolts or place gear as they move up the wall. With the rope secured overhead, any falls are usually short and safe, as long as you have an attentive belayer. If you’re a newer climber, learning how to give a safe and proper toprope belay will also make you a much more desirable climbing partner.
Here are some tips and the best method for giving a good toprope belay, whether you’re using a tube device like an ATC or a brake-assisted belay device like the grigri.
Universal Belay Advice: Pay Attention
This is the most important part of any type of belaying. You must be aware of where your climber is and what they are doing at all times. It can be challenging to ignore the many distractions of a climbing gym or crowded crag—music, other climbers, conversations—but paying attention is absolutely vital to being a good belayer. Watch your climber closely when they’re on the wall and communicate clearly and effectively when necessary.
Load and Lock: Putting a Climber on Belay
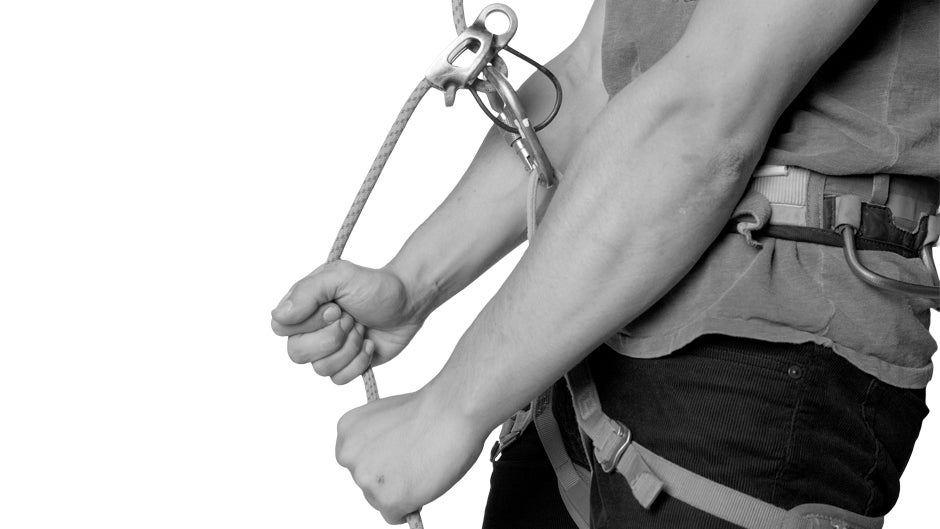
With a tube-style belay device (e.g., ATC or Reverso), thread a bight of the rope through either slot in the device. (Some devices have grooves on one side that make braking easier, so ensure the brake strand is coming out on that side.) For a brake-assisted device like a grigri, thread the bight of rope through the groove, ensuring the correct end leads up to the climber. For either device, clip a locking carabiner through the rope and device, then through the belay loop on your harness. Lock the carabiner.
ADVERTISEMENT
With toprope belaying, the part of the rope that goes up to the anchor is the climber’s end. The other part coming out of the device is called the brake strand. Orient your belay device correctly so that the brake strand comes out away from your harness or to the same side as your brake hand (typically your dominant hand).
Double-Check Your System
You and your partner should visually inspect each other’s knots and belay setup before starting a climb. Make sure both harnesses are worn correctly with all appropriate buckles doubled-back. The belayer should make sure the climber’s knot is threaded through both tie-in points, tied correctly, and dressed properly (no crossed strands).
The climber should make sure the belayer’s device is set up properly: The rope is threaded through everything, and the carabiner is locked. Test the system by pulling on both strands of rope coming out of the belay device. If it pulls the belayer via the harness belay loop, you’re good to go.
Do this double-check every single time either person is about to climb, meaning you might go through this process a few dozen times in one climbing session. These double-checks are vital for preventing mistakes.
ADVERTISEMENT
[Also Read: Common Belay Screw-ups and What To Do About Them]
Toprope Belay Method: PBUS
Pull, Brake, Under, Slide
A universal rule for belaying is that your brake hand, which is palm down on the brake strand of the rope, should never come off the rope. The PBUS method—which stands for pull, brake, under, slide—is a tried and true technique that will ensure your hand never leaves the brake strand, while providing a safe belay.

1. Pull: Pull down on the climber’s rope with your guide hand—which is the hand on the climber’s end of the rope, and usually your non-dominant hand—to remove slack as the climber moves up. At the same time, pull out with the brake hand to get the slack through the belay device.

2. Brake: Put the brake strand in the brake position, which is down in front of you. This puts a bend in the rope at the belay device that will keep the rope from moving through it.

3. Under: Take your guide hand off the climber’s strand and place it on the brake strand under your brake hand, meaning it’s lower on the rope.

4. Slide: With your guide hand now tightly grasping the brake strand, slide your brake hand up the brake strand (without removing it from the rope) so it’s a few inches away from the belay device. Then put your guide hand back up on the climber’s strand.
ADVERTISEMENT
Repeat
You’ll keep doing this PBUS motion each time the climber moves up and creates slack in the rope. Once you do it a few times, it will become muscle memory and you should be able to do it without thinking.
Take and Brake
When the climber reaches the top, falls, or needs to sit on the rope to rest, take in all the slack and put the rope into a solid braking position. Pull the brake strand down in front of you. Use two hands on the brake strand if the climber wants to hang for a while, or consider wrapping the brake strand around your hip and slightly under your bum with only your brake hand on it. The friction and weight from your body will help reduce the force needed from your hand to hold the rope in place.
[Also Read: Why Dynamic Belays Can Matter]
Lowering a Climber
When your partner is ready to come down, take in as much slack through the belay device as possible and put the rope in a brake position down and in front of you. Wait until the climber is comfortably weighting the harness and the rope.
ADVERTISEMENT
For a tube-style device, put both hands on the brake strand and slightly raise the strand to lessen the angle between it and the device. Use the top hand to feed rope through the device while the bottom hand controls the speed. For a brake assisted-device, carefully pull the lever up slightly to allow rope to feed through the device, keeping your brake hand on the brake strand at all times. Keep the lever only partially raised and use your brake hand to control the speed at which you lower the climber.
Be very careful to stay in control. If at any time the climber is moving down too fast, immediately move the rope down away from the device into a strong braking position. If you’re using a brake-assisted device, close or depress the lever to slow the lowering rate.
More Toprope Belay Tips
- Little movements are better than big ones. Instead of waiting to take a bunch of slack in at once, constantly take in any slack in the line. This will make any potential fall much smaller.
- When the climber first starts off the ground or when they are right above a big ledge, keep the belay tight so that a fall and the resulting rope stretch won’t result in them hitting the ground or ledge.
- When first learning to belay, it’s crucial to use a backup belayer, or someone who is also holding the brake strand in case you don’t catch a fall. Not only can a backup belayer provide important pointers as you’re belaying, but they also provide a third person to double-check everyone’s belay and tie-in setups.
- Always have a certified instructor or experienced climber show you this technique and watch you practice it before doing it on your own.