Advanced Climbing Techniques: Simul-Climbing and Short-Fixing
Learn to simul-climb and short-fix for faster ascents
Heading out the door? Read this article on the new Outside+ app available now on iOS devices for members! Download the app.
Editor’s Note: (1) Please check manufacturer’s guidelines for appropriate use of your equipment. (2) This piece originally appeared in Climbing in 2016.
Covering significant amounts of terrain on long routes in Yosemite and Patagonia demands progressive tactics. The best way for a team to advance quickly and stay warm on big routes is to have both climbers moving at the same time. Simultaneous climbing (simul-climbing) and short-fixing are advanced techniques that can help experienced climbers when attempting in-a-day ascents on grade V and VI routes on big walls and in the high country.
Simul-climbing
Simul-climbing is a fast and efficient way to keep the team moving on easy and varied terrain. It offers more protection than ropeless solo climbing, and allows the team to smoothly transition into traditional belayed climbing if they encounter a harder section of rock. The basic concept is that the leader starts the pitch with a normal belay. When the rope runs out, the belayer begins to climb with the belay device still set up on the rope. Falling while simul-climbing is incredibly dangerous because there is no fixed anchor to take the force of the fall. If the second climber comes off, she could pull the leader off the rock, slamming them into the wall. Simul-climbing should only be done on terrain easy enough for the follower to feel comfortable free soloing, and she must maintain the mindset, care, and attention of a free soloist, because falling is not an option.
The Technique
Assess the climb ahead of time. Decide where both climbers feel comfortable without a belay and where the leader may want to stop and belay the follower. The stronger climber should follow because the second falling would be more hazardous than a leader fall. However, the leader must be familiar with the climb, because getting off route in this scenario is problematic.
After a difficult section, the leader can add a progress-capture device (PCD), such as a Kong Duck or Petzl Micro Traxion, to a solid piece of gear. The rope runs up through the device but will not let it go back down. If the second falls, she would weight the gear and the PCD instead of pulling the leader off the wall. When using these devices for this purpose, use a locking oval carabiner on a piece of solid, multi-directional gear. Check the recommended rope diameter for each device. Keep the PCD clean, as the locking mechanisms can be impaired on muddy, dirty, or icy ropes. When using a PCD with teeth, e.g., a Petzl Micro Traxion, the follower needs to minimize slack by not climbing too fast behind the leader. The teeth on these devices can damage the sheath of the rope when arresting a fall. (Note that neither Kong nor Petzl claim that these devices can be used to belay from above.) Using this technique makes simul-climbing safer, but the practice is inherently dangerous and the follower should still climb without falling.

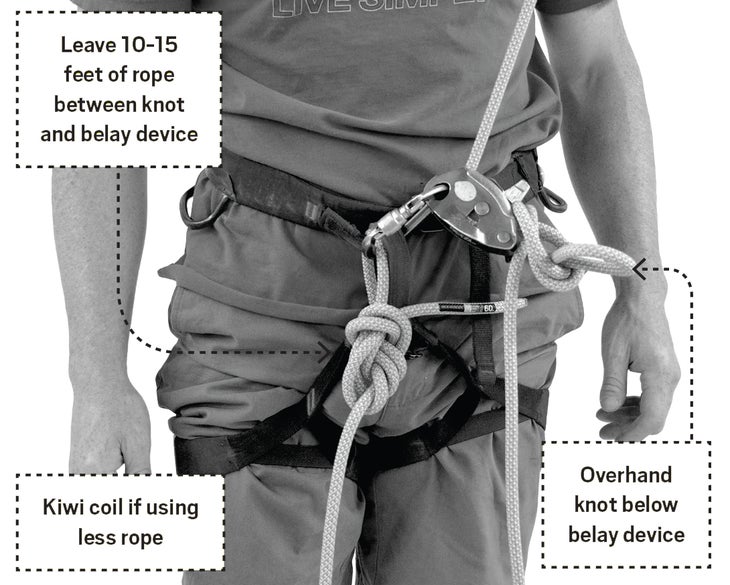
The follower should leave 10 to 15 feet of rope between their tie-in point and belay device. Leaving the belay device on allows the second to take up or feed out rope when needed. An overhand knot on a bight on the brake side of the rope acts as a stopper knot so the second can climb hands-free. In some situations (traversing, wandering, or difficult routes), the rope should be shortened for better communication. Clip a figure eight on a bight to your belay loop 30 or 40 feet from your tie-in knot, and stack the excess rope in a backpack or use a Kiwi Coil. If communication is easy, the follower can ask the leader to place a solid piece of gear and downclimb as they climb through a slightly harder section, minimizing the hazard if she were to fall. The leader can also clip a piece of protection and stay level with the gear while the second uses an assisted braking belay device to belay herself up.
The follower should make an effort to stay ahead of the game. She should make sure her shoes are on and she is ready to climb when the rope goes tight so the leader does not get short-roped. Both climbers should maintain clear and simple communication. Complicated commands add confusion.
Short-Fixing
This adds efficiency on multi-day ascents, but it does require self-belaying techniques. Short-fixing keeps both climbers moving, and it can be safer than simul-climbing. This advanced technique should only be used by experienced climbers who feel comfortable rope-soloing and self-belaying. Unlike simul-climbing, which is better for easy and varied terrain, short-fixing is ideal for steeper aid climbing on clean rock.

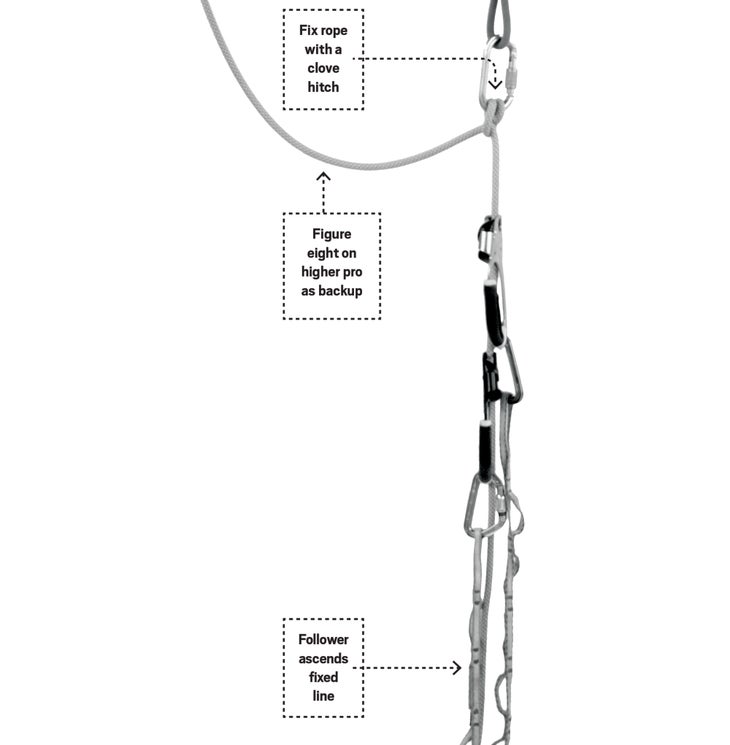
After finishing a pitch and going off belay, the leader should pull up slack and fix the line to a bolted or multi-directional traditional anchor for the second to ascend. For quick and easy anchors at bolted belays, fix the rope by using a clove hitch with a locking carabiner on the lower piece of protection. Clip the rope into the higher piece of protection with a figure eight on a bight. Using a locking carabiner without a nose (keylock) will allow the follower to remove the clove hitch from the carabiner more easily after it has cinched up under the weight of the follower.
If the next pitch is easy and climbs quickly or the last pitch was long and will take your partner a while to clean, pull up the remainder of the slack before fixing the rope so you have plenty of rope to climb the next pitch. If the next pitch is difficult and time-consuming or the last pitch was short, pull up only 20 to 30 feet of slack, as much rope as you think you’ll use in the time it takes the follower to get to the next belay.
After fixing the line, the leader should tell the follower (“Line’s fixed!”) and begin climbing the next pitch with a self-belay.
The most reliable way to self-belay is to use an assisted braking belay device backed up with an overhand knot clipped to the belay loop of your harness. Set the assisted braking belay device up so that the rope going toward the anchor is coming out of the climber side of the assisted braking belay device.
Tie back-up knots and clip them into your harness every 10 to 30 feet (this length may vary depending on the seriousness of the climbing). Unfortunately, feeding slack through the device to move up often requires two hands because the weight of the rope on the brake side of the device can engage the camming unit. Pull out a few meters of slack at a time when short-fixing on aid climbing pitches or doing a short section of free climbing. Many climbers use a PCD clipped to their harness gear loop to hold slack in position on the brake side of the assisted braking belay device so that it feeds through easier. This system allows for slack to be pulled through the assisted braking belay device and PCD with one hand, making easier free climbing possible with the protection of the assisted-braking belay device.
On easy terrain, the leader can continue up with a big loop of slack and no assisted braking belay device (aka American Hero Loop). Keep in mind that using this technique offers only slightly more protection than free soloing or ropeless climbing, and the leader has the potential to take a big fall. This strategy works well on easy terrain that the leader would feel comfortable on without a rope. By clipping gear, the leader decreases the fall. She can shorten the loop of slack (and the fall) by tying an overhand knot and clipping it to her belay loop halfway through.
This technique requires close attention to rope management. It can be confusing to figure out which rope to clip if you choose to tie knots and place protection. Making sure to clip the rope coming from your harness. (I sometimes mark it with chalk.)
Once the second reaches the anchor, he can put you on belay and pull in the slack. You can also clip into two pieces (a mini anchor), remove the assisted braking belay device, and untie the back-up loops from your harness so that your partner can put you on belay without pulling all the excess rope through.
With this technique, it is possible to link several pitches in a row without ever meeting your partner at a belay. The leader should be mindful of running out of gear, and familiarity with the route can help. The follower can also tag up the gear on one of the loops that the leader has coming from their harness. Some teams like to bring an extra rope (30 feet or so, thin in diameter) in order to tag gear.
If moving quickly, the leader might run out of rope while short-fixing. Use the daisy chain or a clove hitch on the climbing rope to clip into a solid piece of gear. Resting on gear will conserve energy.
While short-fixing, the follower is usually ascending the fixed rope with ascenders. This will allow him to move quicker on steeper terrain. If he feels more proficient at free climbing, he can self-belay on a PCD. The follower should make sure to tie back-up knots (figure eights or overhands on a bight clipped to the belay loop with a locking carabiner). This will back up the ascenders or PCDs while managing the rope. Big loops of slack below the follower can hook around features and cause snags. When the follower reaches the anchor, he should put the leader on belay as soon as possible—before unclipping the fixed anchor. If the leader is out of rope when the follower reaches the anchor, he can put the leader on belay below the anchor with the slack from the pitch below. Manage the ropes while belaying. A proper belay means the leader can climb faster and more confidently.
Editor’s Note: Please check manufacturer’s guidelines for appropriate use of your equipment.
Miranda Oakley became the first woman to solo the Nose of El Capitan in a day in August 2016, with a time of 21 hours 50 minutes.