Big Wall Kit
"Big-Wall-Kit"
Tap into an expert’s hard-won knowledge for success on a big wall
Depending on the type of pulling down you’re doing, climbing can vary from minimalist to “everything but the kitchen sink,” and big wall climbing is very much the latter. Doing multi-day routes not only requires aid climbing equipment (protection, aiders, ropes, helmet, etc.), but also demands carrying all the food, water, and camping supplies you’ll need to sleep on a vertical face for a few nights. This baggage adds a lot of weight and complexity to your systems, not to mention the time and physical effort required to move it all a few thousand vertical feet. Correctly choosing and managing your gear can mean the difference between success and failure. To simplify this complicated process, we asked Colorado climber Paul Gagner—who has done more than 50 wall routes around the world, including first ascents on Baffin Island and in Utah’s Fisher Towers—to detail his packing list and the experience-driven tricks that go along with it. Visit climbing.com/first-big-wall for more on big wall basics.
The gear displayed in these pages is recommended for a “trade” route (meaning it is traveled often and requires little or no hammering), such as El Capitan’s 16-pitch Zodiac (5.7 A3-). The aid “A” scale goes from A0 (mostly free with simple aid) to A5 (a lot of body weight–only pro and big falls possible). Zodiac’s rating suggests moderately difficult aid, with 5.7 as the hardest mandatory free climbing. This route often goes hammerless, so you may see a “C” rating, indicating clean aid.
TRAD RACK
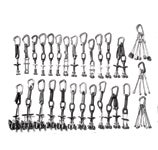
Whether your objective is all free climbing, mostly aid, or somewhere in between, the trad rack is where to start when assembling gear. Gagner carries a standard rack of cams from No. 0.1 (A) to No. 4 (B), with doubles in all sizes. (Specific routes may require more cams of a given size, or larger pieces. Check the guidebook for the recommended rack.) “Offset cams (C) are key for aid climbing,” Gagner says. That’s because many of these climbs, especially on granite, not only have flared cracks but also were first done by hammering pitons; a lot of this “permanent” gear is no longer there, and what’s left behind are irregular scars and fissures that take offset cams (and nuts) perfectly.
Micro-nuts (D) are important because you will probably encounter lots of super-thin seams. Be aware that some really small nuts and cams are aid-only, meaning they’re not designed to catch a dynamic fall; they’re only intended to hold body weight. Gagner carries about 50 to 80 loose biners (E) and 10 to 12 quickdraws (F) for attaching gear to the rope, extending pieces, and building anchors. Chris McNamara of SuperTopo (supertopo.com, an excellent big wall climbing resource) says, “Bring more biners than you think. Then bring some more.” To save space on the rack, you can group similar-size pieces (G) on one biner, but once a piece is placed you’ll need a free biner or quickdraw to clip it to the rope. About 15 lockers (H) are needed for clipping haulbags and jumars, creating master points on anchors, belaying, etc. Pack at least one beefy cordelette for building anchors.
Saving weight on a big wall is paramount. If you’re doing a five-pitch trad route, you can get away with heavier gear because you won’t be carrying it that long. On an aid climb, the gear, food, and water for a week-long route can easily weigh more than 300 pounds (split between two people). “The misery of carrying a lot is part of the experience,” Gagner says. It may be possible to pay dirtbag climbers—who abound in Yosemite Valley—to ferry gear for the approach or descent. But Gagner considers that cheating.
PERSONAL CLIMBING EQUIPMENT
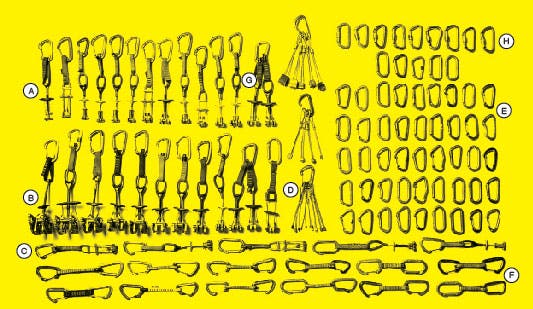
“Big walls are all about little tricks,” Gagner says, and once you understand and master those tricks, you’ll have success on these massive endeavors. One key is to beg and borrow all the gear you can from everyone you know. The whole kit can cost upward of $5,000, so buying everything right off the bat is difficult for most. You will definitely want your own set of jumars (A), a double-racking sling (B), and belay devices (C)—an auto-blocking tube-style and an assisted-braking device, like the Grigri. Your harness (D) should be the beefiest, most comfortable one you can find; many companies make big wall–specific rigs. Gloves are a must, and kneepads are highly recommended (E) because, Gagner says, “Your hands and knees will get mangled.”
You will leave the fifi hook (F) on your harness at all times because it allows you to quickly go in direct to a piece of pro. However, Gagner recommends leaving your hammer (G) in the bottom of the haulbag “so you’re not tempted to use it.” Although trade routes like Zodiac should not require much or any hammering, it’s good to have a hammer in case old pitons or Copperheads need to be fixed or replaced. Plus, on harder routes, entire rock features sometimes fall off, and you might need a hammer to create a new belay or rap anchor. A rope-capture pulley (H) is a necessity for hauling. You should wear a helmet at all times to protect from rockfall, plummeting things from above, and gear that pops out and hits you directly in the noggin. Two personal daisy chains (I) and two sets of two aiders (J), or etriers, are ideal for transitioning from piece to piece. Gagner prefers adjustable daisies, with which you can easily fine-tune the length. A knife and accessory cord (K) for lowering-out after a traversemay come in handy. For aid pitches, wear stiff-soled approach shoes with sticky rubber soles.
BASIC HOOKS
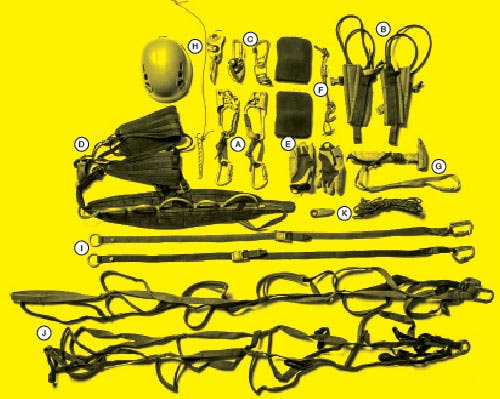
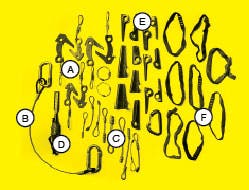
Wire rivet hangers (A) are great for when you encounter a bolt without a hanger: Slide the loop over the bolt behind the head, clip your aiders into it, and your body weight will cinch the wire over the bolt. Gagner recommends 15 to 20 for easy to moderate routes. Keyhole hangers (B) also temporarily hang on bolts and are removable. Duct tape (C) can be used to pad sharp edges and protect the rope, or to tape hooks into position for pro. Black Diamond Cliffhangers (D) and the larger Grappling Hook are great for edges of all sizes; they hook over small features while the points on the sides stabilize the placement laterally. The three-pronged Talon (E) is very stable on small granite edges because of its equilateral design. Cam hooks (F) are a go-to clean-climbing piece; they’re ideal for pin scars. Place them sideways (as if you were to treat the edge of the crack like a sidepull with the hook), weight it, and the hook will cam into the fissure. Rack all the hooks and hangers on your harness so they’re accessible; Gagner carries the hooks in a small stuff sack so they won’t tangle. You may want to carry an emergency bolt kit for the same reason you may want a hammer: to fix or replace old gear. However, Gagner wouldn’t bother with a bolt kit on trade routes like the Nose or Zodiac. A basic bolt kit includes a hand drill (G), hangers (H), wrench (I) for tightening bolts, allen wrench (J) for tightening the drill bit on the handle, bolts (K), and a blow tube (L) that is used to remove debris from the holes while you drill them. All the bolt-kit items are normally carried in a small stuff sack deep in a haulbag, and only pulled out for emergencies.
INTERMEDIATE AID GEAR
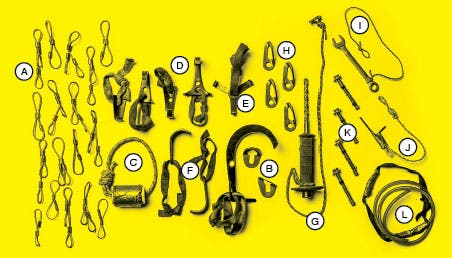
For walls that are less-traveled and require placing gear in smaller fissures, you’ll need a next-level aiding kit. Peckers or Tomahawks (A) can be hand-placed like a hook or they can be hammered into the thinnest seams and cracks. The Funkness (B) is used to remove hammered pitons: Clip one end to the hammer and the other to the piece, and then flick up and out. Copperheads (C) are hammered into tiny grooves; the head material will deform around bumps and abnormalities for more holding power. Use the chisel (D) to paste Copperheads into position. Pitons (E) come in a variety of shapes and sizes and are hammered into weaknesses in the rock. They’re used in flaring, incipient, or parallel cracks and pods where a nut or cam won’t fit or hold. Short, thin tied-off slings (F) are useful for many things, including reducing the leverage when you clip the rope to partially driven pitons.
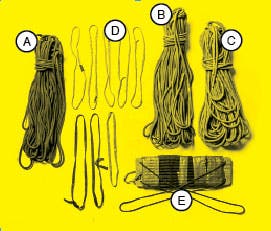
SOFT GOODSGagner prefers to carry three ropes—two dynamic and one static—though more may be needed if you plan to fix many pitches. Both of his dynamic ropes (A and B) are 10.2 millimeters and 60 meters, and his static rope (C) is 7/16” and 60 meters. (Never lead on a static rope.) A thin (8mm) tag line often is trailed by the leader to haul up extra gear mid-pitch, or to bring the haul line up to the anchor at the end of a long lead. Bring at least a dozen longer slings (D) for extending gear placements, just as in regular trad climbing, and for other uses. The bosun’s chair (E) is crucial on many walls, as it provides a supportive and rigid seat for the belayer to sit in when he is on duty for hours at a time. Hanging in the most comfortable big wall harness out there would still cause some discomfort and pain, especially on the waist and under the ribs, and this chair alleviates that. You can buy them premade or fashion your own with some wood, an old sleeping pad, duct tape, and cordelette.CAMPING GEAR
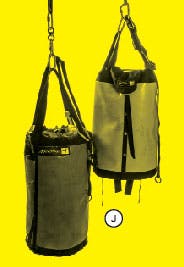
The portaledge (A), sleeping bag (B), bivy sack (C), and rain fly (D) for the portaledge are basics for comfort, warmth, and weather protection. Keep food (E) in stuff sacks for organization and easy access. You’ll need a few liter-size water bottles (F) and several gallon jugs (G). Gagner plans a little over a gallon per day for two people, unless it’s hot–—then he packs two gallons a day. He sewed mesh pockets in the middle of his portaledge for organization of water bottles and other personal items. The poop tube, or in this case Metolius Waste Case (H), should have a few prepared poop bags ready to go. (Build your own poop tube: climbing.com/skill/super-dooper.) Gagner recommends the Restop brand because they have no odor. Two people can use one bag per day. Make sure to hang these separate from everything else. Don’t forget spoon, knife, headlamp, first aid kit, and Bonnie’s Balm (I). “Your hands get worked on a wall, especially your cuticles,” Gagner says. “Put balm on them at night for hydration and healing.” Bring an extra water bottle cap for large jugs. These are easy to drop and impossible to clip to anything. Carry synthetic everything, including sleeping bags and clothes. If you get wet, these will dry quickly and still keep you warm. Bring a sponge to sop up moisture off the rain fly or anything else that gets wet. Haulbags (J) are awkward to carry but streamlined and durable for hauling; for longer walls, pack two large bags (one per person) and one day bag for easy access to food, water, layers, etc. Clip one large bag on top with the day bag, the second large bag below that, and the poop tube and portaledge together beneath that.

Paul Gagner did his first El Capitan route in 1979 when he was 19 years old. Thirty-four years later, he has 20 El Cap routes under his belt (about 35 Valley routes in all), with plans for more. At press time, he and a partner were headed to Yosemite to attempt the seldom-done Reticent Wall (VI A4 R).