Published January 18, 2019 12:25AM
Learn This: Build an Organized Big Wall Anchor
"None"
With big-wall climbing, technical skills are more important than how hard you climb—success depends on several micro-systems working together simultaneously toward one goal. One critical micro-system is anchor organization and management, which will help you stay safe and move efficiently, so that you and your partner aren’t restacking your rope a dozen times or spending hours at the anchor unclipping and reclipping things amidst a snarl of ropes, haulbags, and gear. As an example, if you are climbing a 20-pitch route and sharpen your systems enough to cut 10 minutes off at each belay, you’ll save three-plus hours. This is a lesson I’ve learned after various trips up El Cap, including a recent ascent of Zodiac in-a-day.
Most trade routes in Yosemite, such as the Nose, have bomber three-bolt belays. Assuming this as the standard, your anchor kit should consist of:
- Two pre-rigged 6 or 7 mm cordelettes, each with a figure eight on a bight in each end (not a continuous loop tied together)
- 8–12 locking carabiners, at least 4 of them large lockers
- 5–7 standard biners for various clip-off needs
Rigging
When you reach the anchor, clip both daisy chains into a hard point so you’re safe while getting organized. Then take a moment to stop, breathe, and visualize where everything will go.
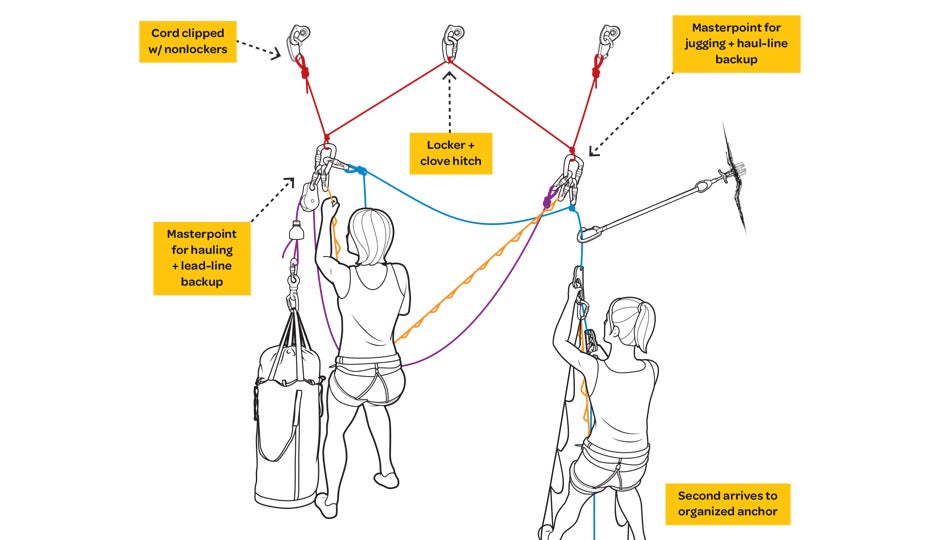
- With your cordelette, use nonlocking carabiners to clip one end to the left bolt and the other to the right bolt using the pre-rigged bights.
- Tie a clove hitch in the middle of your cordelette and clip that to the center bolt with a locker—this helps you adjust the anchor length to your needs.
- Equalize and tie an alpine butterfly knot between the first two bolts and again between the second two bolts. I prefer an alpine butterfly because it’s easier to untie after being weighted than a figure 8—go online for knot-tying beta if you’re not familiar with the butterfly. Now you have two equalized master points.
- Clip a large locker to each master point and lock the gate. Anything you clip in will be to one of these large lockers instead of the cord. The lockers act as rigging plates, enabling you to clip multiple things without pinning items (or people).
- Clip yourself into both master points and yell down, “Off belay!”
What if there’s no three-bolt anchor?
With a two-bolt or gear anchor, keep things organized with a single master point to which you clip a rigging plate like the Petzl PAW or a large locker. Everything revolves around and should be clipped into this point.
ADVERTISEMENT
Refinement
Now it’s time to get your anchor tidy and organized for max efficiency.
- Look down to see where your partner will be jugging up; pull up the lead line and fix it to whichever master point makes the most sense. (Fix the lead line first, then the haul line. If you aren’t able to communicate with your belayer, he will know that the lead line is fixed when you pull up the haul line.) Let’s say your partner will be ascending from the right—fix him to the right master point with an alpine butterfly and save the left master point for hauling.
- Clip a back-up (figure eight on a bight) for the follower onto the left master point, so he’s into both systems.
- You can now use the left master point for hauling, without worrying about the ropes crossing or rubbing each other. To begin, do not keep the end of the haul line on your harness—before hauling, I’ll clip the end of the haul line to the other master point in case the hauling device fails. After you’ve hauled, be intentional when docking your haulbag—ideally it will be underneath everything, making it one of the last things you’ll unclip and letting you keep your personal anchor system/daisies on top to easily adjust or unclip. (As mentioned earlier, the large carabiners should help you to not jam things atop one another.) If the succeeding anchor appears off to the left, dock the bag on the left master point. As your partner lowers the bag out, it won’t fall on him or get clustered.
- When you take off leading the next pitch, your follower is left with a tidy anchor he can easily disassemble. Remember to take the second (spare) cordelette setup with you for the next anchor.
Anchor hygiene
A few key ropework/hauling tricks:
- Flake both ropes separately and neatly into long, 30-foot coils and clip them off to the side with a shoulder-length sling. (You can also pool the rope into a large tote, such as an IKEA bag.)
- Haul the haulbag as high as possible before you dock it, without actually jamming it into the haul device. Access to water, snacks, or a seat is now within arm’s reach.
- The haul pulley goes on top of everything (you need to free it when you dock the bag).
Alexa Flower works on Yosemite Search and Rescue during the summer and ski patrols in Colorado during the winter. She has climbed more than 20 big walls in Yosemite, including El Capitan 12 times.