Published May 18, 2016 09:47PM
Learn This: How to Glissade
Stay in control with these masterful glissading techniques
"None"
This story originally appeared in the October 2015 issue of our print edition.
The descent after a long day of climbing can be the painful, knee-jarring crux of the day, but glissading down a low-angle snowfield provides a welcome rest for the joints and a super-fast way to lose a thousand feet of elevation in a matter of minutes. However, for the inexperienced mountaineer, a seemingly fun and harmless slide down the mountain can quickly turn into an uncontrollable yard-sale slip-n-slide that ends in injury—or worse. Before you decide to slide, read up on these techniques and pre-glissade considerations to stay in control and get down safely.
Technique
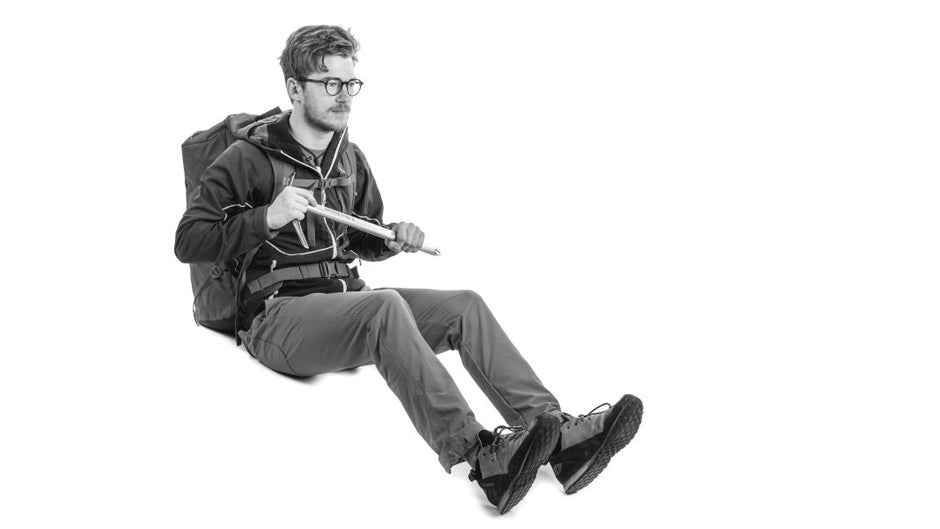
Glissading is simple in theory: The climber sits on his butt and leans back a little bit with feet out in front and legs slightly bent. If the angle is not steep, to get started he will have to scoot forward using his feet, just like a kid going down a slide on the playground. As the climber descends, he should use his ice axe and the heels of his boots to maintain slow speed and stay in control. It’s often a good idea to put on some waterproof shell pants to keep your bum dry, but keep in mind this will lower the friction and increase the speed, so it’s best for lower angles. One rule: Always wear a helmet and gloves. The latter is not for warmth, but for protection. Snow can be surprisingly abrasive, and a thin glove layer will protect one of your most vital climbing assets.

• Tighten pack with nothing loose clipped to the outside
• Pick of axe points away from your head and torso
• Keep legs loose, bent, and responsive
• Be prepared to dig heels in for stopping power
• Wear sturdy pants that are water resistant
ADVERTISEMENT
Legs Bent
Glissade tracks are far different and wilder than the corduroy groomers one encounters at a ski resort. Variable snow conditions and the angle of the slope are objective factors that determine your speed, but having loose and responsive legs will help you react quickly to any small surprises. Completely straight legs and locked joints transmit the force directly into your knees and the rest of your body, resulting in jammed and sprained joints. Keeping your legs bent acts as a shock absorber, dissipating the force gently throughout your muscles to save those precious body parts.
Ice axe
Run your axe diagonally across your torso, with the head up near your shoulder and the spike (at the bottom of the axe) pointing down to the snow next to your hip. Either direction works, but it can be easier to maneuver with your dominant hand on the head of the axe. In a self-arrest situation, this is the hand that will have the most control and power over the axe. The thumb cradles the adze, which is pointed toward your chest, and the fingers go over the top of the pick, which is facing away from your body. With one hand just above the spike of the axe and the other hand wrapped around the head, this setup will serve as your primary brake when dipped periodically into the snowpack. If the speed gets out of hand, roll your body over toward the pick side, so you are lying on top of the axe and digging the pick into the snow, and execute a self-arrest by putting all your body weight onto the pick and kicking your toes into the snow. Some mountaineering texts counsel against the kicking-toes portion, for fear of breaking your ankles or flipping you over, but using just your pick in most snow conditions can result in worse consequences. If you didn’t bring an axe, seriously consider not glissading, as you will no longer have an effective way to self-arrest. If the slope angle and snow surface are moderate enough and you decide to glissade, use a trekking pole, nut tool, or even a couple of rocks in your hands (wear gloves!) for a relatively effective way to check your speed. You’ll have to dig all of these tools as deep as possible for stopping power.
Speed Limit
It’s fun to go fast, but in this case, too much speed can be deadly. Glissade paths frequently have little washboard dips and divots that can bounce and jostle climbers out of control. Periodically do a speed check to ensure this does not happen. Do this by digging your heels and the spike of your axe into the snow until you’re at a more comfortable speed. Your personal speed limit depends on your skill and confidence in self-arresting, but as a general rule, if you are reaching speeds where you are bouncing and losing contact with the snow, come to a complete stop before starting again. Glissading accidents have resulted in major injury and even death. Remember this adage: Slow is fast in the mountains.
ADVERTISEMENT
No Crampons
Glissading is all about going, and crampons are all about stopping. The toothless heels of your mountaineering boots work perfectly fine to help control a slide, while crampon spikes will catch on hidden rocks, debris, or ice under the top layer of snow. The ensuing abrupt stop may be enough to send you tomahawking down the slope head over heels (or sprain an ankle or torque a knee). Ditch the crampons during the slide, but keep them accessible inside your pack, as you might need them when your slide stops. Consider the snow conditions around you before hopping up on your cramponless boots to walk off the snow. You may need to put crampons back on to continue the descent, lest you find yourself frantically kicking at the ice with toothless boots in precisely the worst place to put crampons back on.
Prevent Yard Sales
Climbing a mountain is tiring. On the descent, fatigue translates into laziness and potential injury. Using the compression straps on the outside, make sure your pack is tightened down into a compact bundle without anything loose strapped to the outside. If you must leave anything on the outside, run a pack strap through it so it stays with you. These objects can easily detach during a glissade, meaning you must trek back up to retrieve them on a hazardous slope. Unlike river crossings, you should wear the hipbelt so that your pack moves with your body and doesn’t become a problem as you travel down the snow.
Consider This:
Snow Conditions
Ski mountaineers know that the difference between a sweet corn run and a scary ice slide is often a matter of waiting for the right moment when the sun has softened the snow surface sufficiently. Glissaders need to do the same. If the snowpack underfoot seems bulletproof or icy at all, take a long rest and let it become slushy. If possible, analyze the descent on the way up. Keep in mind that if your intended glissade path is rock-hard on the ascent, you can take a little extra time on the summit so the snow will be the right softness. Again, the exact consistency of glissadable snow is a matter of both personal comfort and how steep the angle is, but a general guideline is that you should be leaving boot prints that are at least two inches deep.
ADVERTISEMENT
Snow Slides
Most glissading occurs later in the day, when the snow is really soft from baking in the sun. In these conditions, the disturbance caused by a glissade is more than enough to trigger a small avalanche. Suddenly you’re traveling on a rolling carpet of snow and it becomes impossible to get your axe into something solid underneath. As you’re rocketing down the mountain, look at the snow ahead of you. If it appears to be moving with you, stop and let the mass move well ahead. If you can’t stop, barrel roll out of it by flinging your arms out in a helicopter motion and rolling out to the side of the slide path. Claw out into the stable snow with your hands and axe. Hang on to your axe if you can, but at this point it’s most important to get out of the slide.
Check the Runout
Though a slope might look viable at first, your big ride could end abruptly in a crevasse, a cliff, or a pile of jagged rocks. If you can’t see the entire glissade path, don’t glissade. Be especially wary of glaciated terrain, as crevasses are more difficult to spot. Remember, there is no situation in which you are forced to slide—glissading is always optional, so use your best judgment if things don’t look just right.
ADVERTISEMENT
Kel Rossiter has a doctoral degree in educational leadership and is an AMGA-certified Alpine and Rock Guide. He’s also the owner and lead guide for Vermont-based Adventure Spirit Guides.