Published August 12, 2022 09:39AM
Dial In Your Outside Edging And Crush Steep Climbs
Climbing straight on, hips parallel to the rock is the natural way to climb, but on steep rock this technique drains power and limits your reach. Learn the proper way to outside edge and step through and you will boost your performance without having to get stronger.
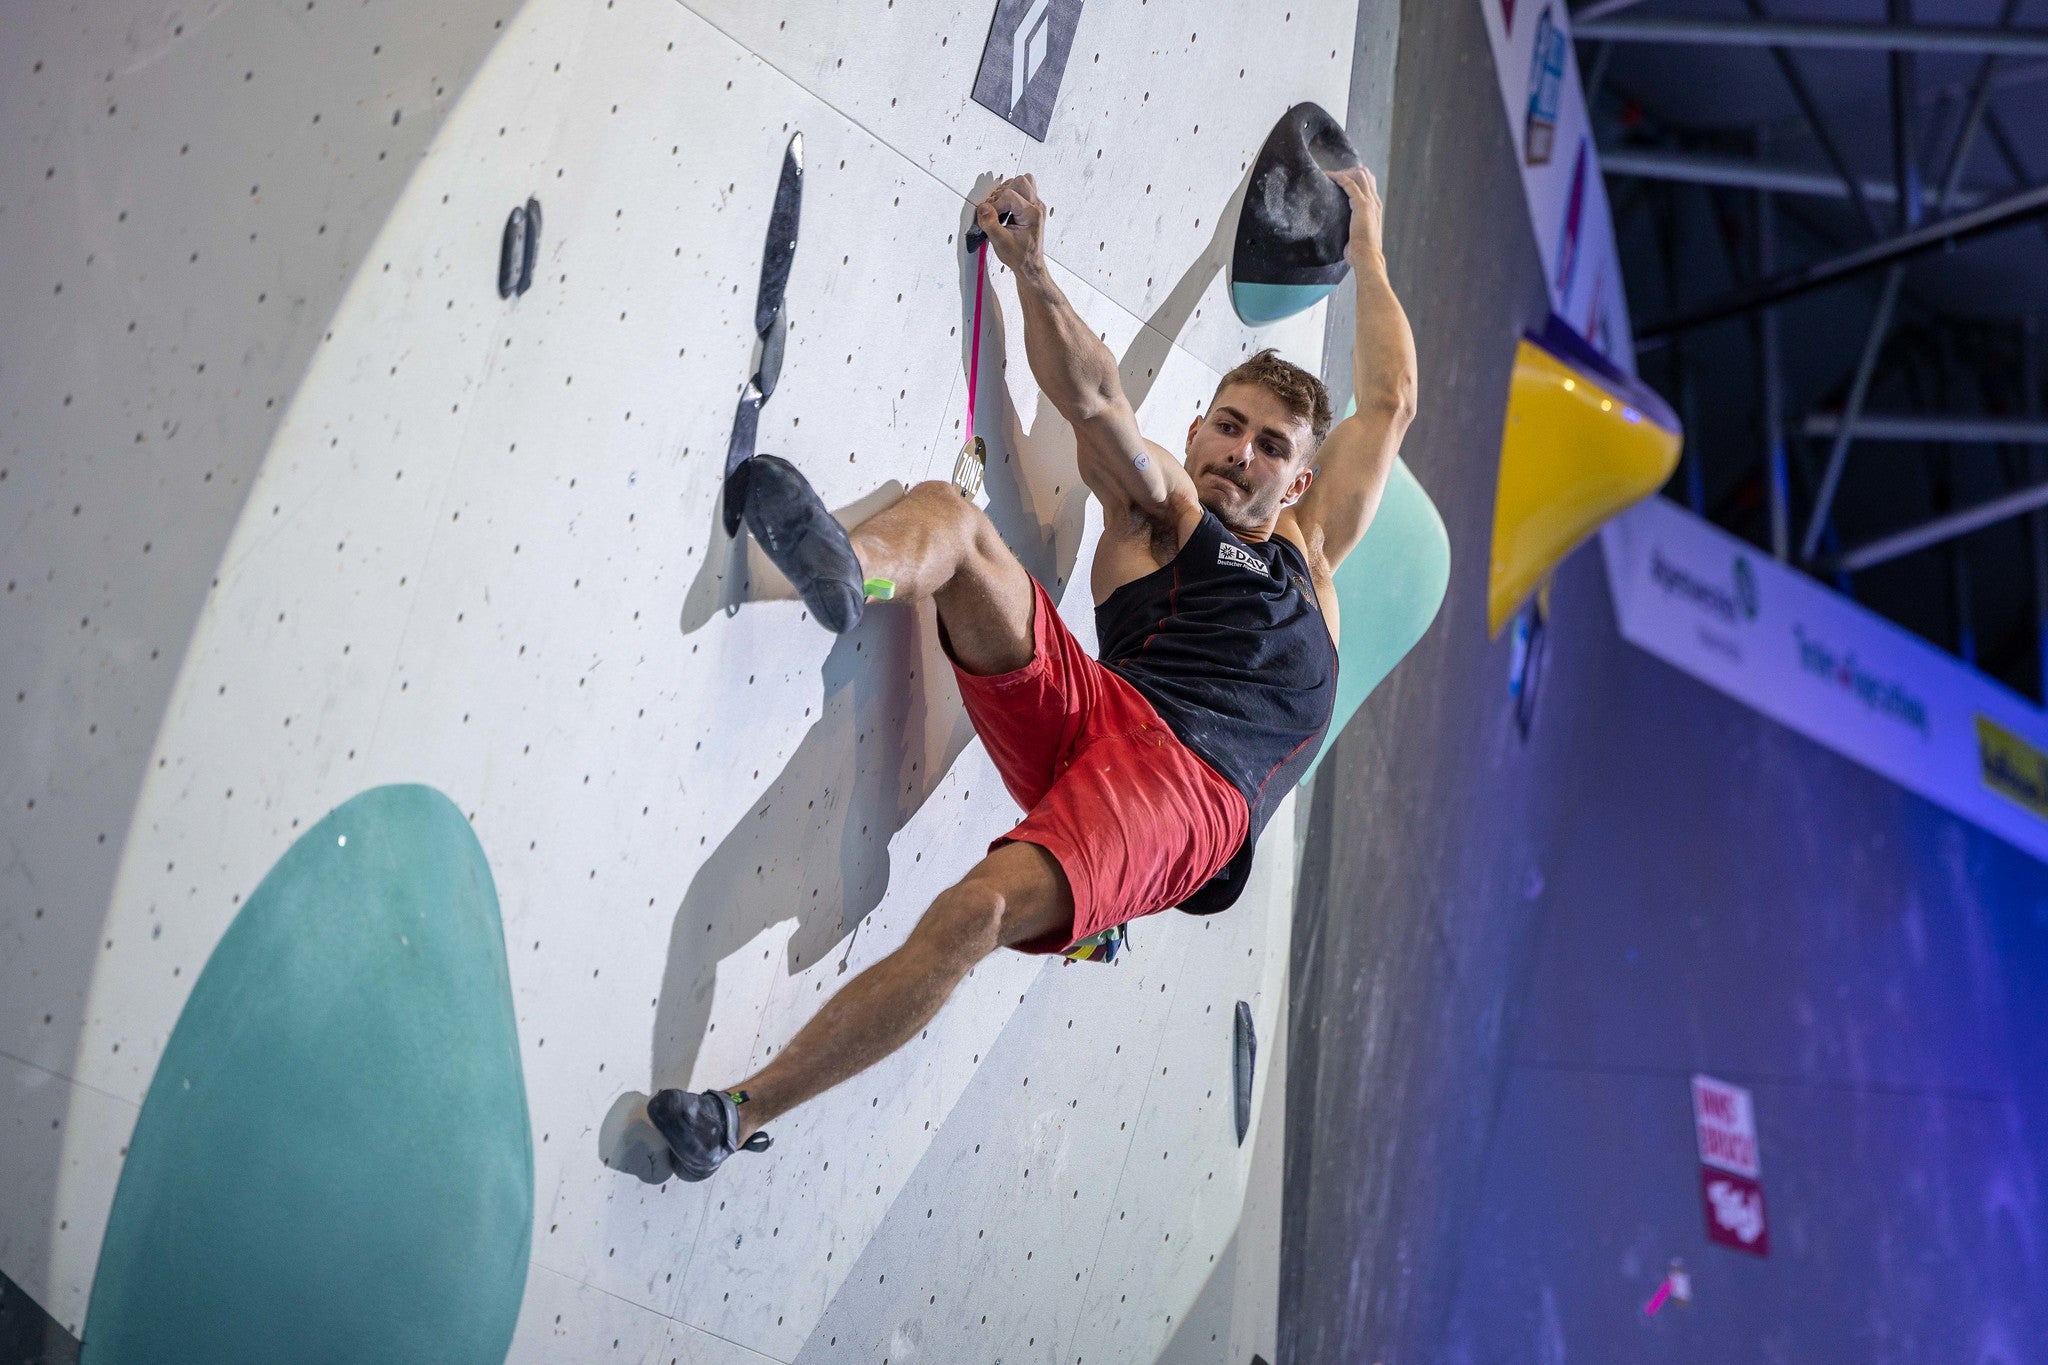
Pro climber Yannick Floe of Germany executes an outside edge/step through move at the Boulder finals during a World Cup competition in Innsbruck in 2022. (Photo: Jan Virt/IFSC)
Many beginners and even more advanced climbers find that they struggle on steep climbs and lack of strength is often listed as the cause. However, in the majority of cases success is not about doing more pull-ups, but learning new techniques! In this series we’ll examine how to climb overhangs with skill and finesse—using the outside edge, for example— rather than brute force. If you’ve progressed to V3 or 5.9/10 pretty-much without guidance, then these essential techniques will trigger the next chapter of progression in your climbing.
The Effect of Intuition
When we learn to climb we tend to spend more time on slabs and vertical walls, which teach us to climb with our hips parallel to the wall and our feet turned out (so-called the “front-on” style). This is also the way humans climb naturally and the way we climbed trees as children, so this style is deeply engrained. Yet if we attempt to apply this same approach on overhanging walls it causes two major problems. First, in order to make each reach we need to rely heavily on arm strength by pulling up and locking-off (holding our arms bent). Second, when we go to make the reach, we will feel wildly off-balance and our hips will swing violently away from the wall (aka: barn-dooring), meaning that we are forced to lunge for the target handhold. You may get away with this method once or twice on a short boulder problem with big holds, but you won’t manage it on a harder problem. Similarly on steep sport route, you’ll burn gas at an alarming and it will only be a matter of time before you pump out or miss a hold and slump onto the rope. Above all you’ll simply get the feeling that you’re doing it wrong.
The correct way to move on overhangs is to twist into the wall and climbing “side-on.” We often overhear coaches telling their clients to do this, but how and when should you twist? The first few times you try can feel awkward and weird and it’s common for beginners to find themselves twisting in the wrong way and at the wrong time and generally feeling bamboozled.
ADVERTISEMENT
The answer, rather than trying to twist in, is to identify three clear and separate techniques, the third of which has two variations:
- Step-through / outside-edge
- Drop-knee
- Flag (inner and outer)
The purpose of these techniques is to reduce the amount of arm-strength required and secondly to enable you to reach in perfect balance. These moves are not intuitive and we usually need to learn them either by mimicking or being taught by a coach. In this article we’re going to look at the first technique—stepping through and using the outside edge. We’ll examine the other two techniques in articles soon to follow.
Step-through/Outside edge
This crucial technique ends up becoming the staple movement sequence for overhanging walls, so if you don’t know it—prepare to be amazed and improve by grades! The step through applies to any situation on an overhang when we only have one foothold to stand on. To recap, when we see a foothold on the left, our natural instinct is to put our left foot on it, and this is what causes all the problems with balance and so on. However, the key is to step through and place the outside edge of the right foot on the hold. Let’s call this foot the active foot, as it’s the one that uses the only foothold that’s on offer. Position your foot using the toe part of your shoe and not the rounded, middle part, with the foot at approximately 45 degrees to the wall and not totally parallel.
Also Read: Climb Better With Paige Claassen’s 6 Tips
The other leg is thrown out wide and the passive foot simply rests flat against the wall to stabilize and brace the position like a tripod. If you’re climbing on rock or a featured panel then try to find a suitably positioned dink or micro-smear for the passive foot, but don’t pick something that forces you out of balance. You can then use the passive foot to provide extra thrust and to steer you slightly sideways for the diagonal reache. Don’t place the passive foot too low or it will be dragged up the wall as you gain height and you’ll be off-balance when you let go to make the reach. Place the passive foot slightly higher than instinct might suggest, so that you’re balanced throughout the entire move and not just at the start. Sometimes on very steep overhangs it will feel more comfortable and balanced to hold the free leg out in mid-air, rather than bracing it against the wall.
ADVERTISEMENT
Also Read: Counterintuitive Climbing Tips To Change Your Game
When you reach, the main power comes from the active foot (ie: the one that’s placed on the main foothold with the outside edge). As you drive up with this foot, the shoulders twist, enabling you to reach without having to pull, bend and lock-off with the active arm. In fact, on most moves the active arm will be virtually straight and you may only need to bend it slightly to make the very longest reaches. If you’re struggling to visualize this, imagine the active arm as one page of a book and your chest as the other, then simply close the book to make the reach. Don’t let go of the lower hand hold too early and instead push down on it to for assistance. Only let go once you’ve gained full height.
The key to understanding this move is that the footholds must be mirrored—footholds on the left-hand side of the body must be used with the right foot. When you first start practicing you may find that you can get it right on easy ground but you may be prone to reverting to front-on style when pumped and in high-stress situations.
ADVERTISEMENT
A note for higher level climbers is that they may spot the correct foot sequence and get the body position approximately right, but they may not necessarily execute the move with maximum ergonomic efficiency, usually because they bend the arm and pull harder than necessary.

Outside edge notes
Outside edge is not the same as drop-knee! Many climbers confuse these two techniques because they look similar at a glance. However, the crucial difference is that you perform the outside edge/step-through when you only have one foothold, whereas you perform the drop-knee when there are two footholds. We’ll be looking at drop-knees in a separate article.
A common mistake when practicing is to step through too far. If it feels like a real strain to reach the foothold and the move feels weird and contrived then this is a sign that you’d probably be better off staying front-on (left foot on the left, right foot on the right). Another teething problem is simply to step through too much. As a lose rule of thumb, when you are climbing very gently overhanging walls, say 10 to 15 degrees overhanging, then you will probably need to step through and go side-on approximately 40 to 50 percent of the time. However, the steeper the wall gets the more likely you will need to go side on, and for walls of 35 degrees you will probably be side on at least 60 percent of the time.
ADVERTISEMENT
Look out for articles in this series on drop-knee and flag, to complete the picture for efficient climbing on overhanging walls.
Also Read: Basic Techniques From Handholds to Footwork and Drop Knees