Published November 29, 2013 02:08PM
Rappelling: Learn the Basics of This Essential Technique
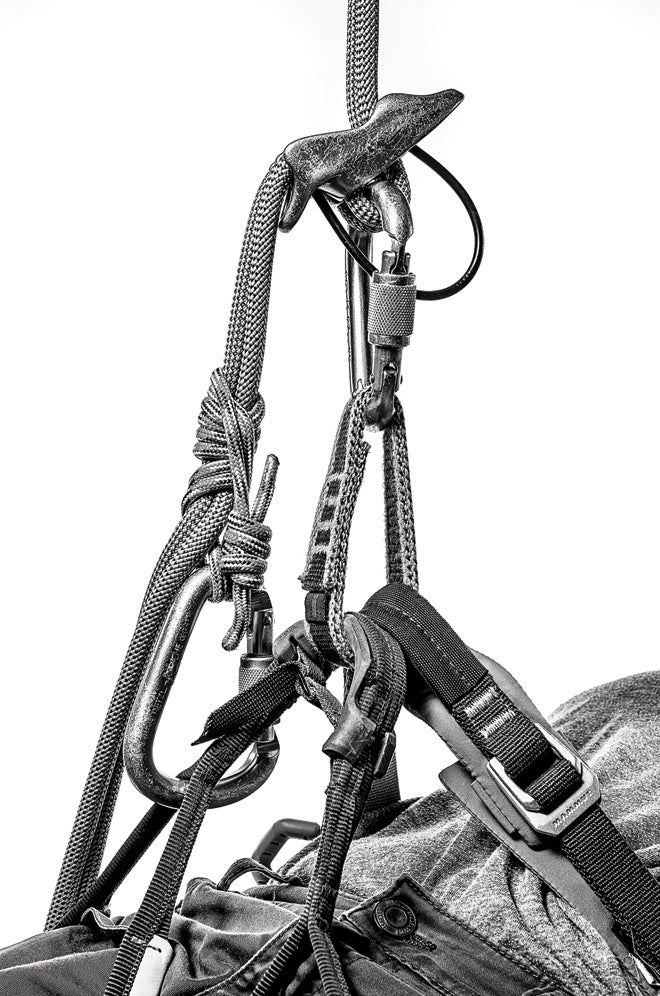
"How-to-Rappel-Clinics-660"
Getting to the top of any route is a success, but it also means one thing: You’re only halfway there. To descend single- and multi-pitch routes, rappelling is an excellent option that gets you down quickly and puts minimal wear on fixed anchors. The process of rappelling is simple in concept, but it can seem complicated in practice, especially at first. Mistakes are easy to make; accidents happen all the time—and they’re often fatal. Here’s the step-by-step process of rappelling plus some tips to prevent mistakes.
The following instructions assume the rope or ropes are already set up, they will reach the next anchor, and the ends are knotted or touching the ground.
ONE After the ropes are safely set up through the rappel anchor, you should be clipped directly into the anchor with a personal anchor tether and a backup, and untied from the rope. Clip the rappel device to your belay loop with a locking biner (don’t lock it yet), and then pull up a few feet of both strands of rope. It will be heavy, so have your partner hold the rope up, or step on it to create slack so it’s easier to clip in.
TWO With that slack, create two small bights in each strand and push them through the openings in your device, keeping the brake end of the rope (the section that leads to the ground) coming out through the friction grooves—if your device has them. Orient the brake/friction-groove side so it’s on your dominant side. Keeping the biner on your belay loop, clip it through the device and both strands of rope. Now lock it.
THREE Before letting the rope drop, pull the brake strands up and through the device as much as possible. Stand higher or pull up on the anchor to lift your body up; keep pulling until it’s clear that you’re fully weighting the rappel setup and not your tethers going directly to the anchor (they should be loose, not taut). If the rappel device is not set up correctly, it will not hold your weight, and you will have to set it up again.
FOUR Double-check that both strands of the rope are threaded through the device; the biner is clipped through the device, your belay loop, and both strands of rope; and the biner is locked. (Have your partner check, too, if he is around.)

FIVE Set up your auto-block (climbing.com/skill/rappel-to-ascend) so it’s wrapped around both strands of rope below your belay device, clipped to your leg loop, and the biner is locked. An auto-block is a rappel backup or a “third hand,” meaning if you get knocked unconscious or lose control of the rope, it will tighten up and keep you from plummeting downward. (It needs to be short enough so it can’t get caught in the belay device, which would render it useless.) Beware that if the leg loops have auto-doubled-back buckles, the auto-block could undo the buckle when weighted. If you do have those buckles, clip the biner to the inside of the leg loop-waist connector, near your crotch.
SIX Once you’re fully clipped in, it’s time to start moving down. With one hand firmly on the brake strands in a locked-off position (like when belaying: down and behind your butt), undo the tethers connecting you to the anchor. Now put that second hand on the brake-side of the rope over the auto-block. With the lower hand, slowly feed the rope up through the belay device. Use the top hand to move the auto-block down the rope so it won’t tighten up.
SEVEN As you start to move downward, you will be able to figure out the ratio of how fast you feed the rope to how quickly you move down the rope. Don’t go too fast or you might lose control. Once you’re safely clipped into the next anchors or on the ground, unclip the biner from the device and ropes, and then quickly clip just the device again, pulling it free from the ropes. Yell “Off rappel!” up to your partner.
Tips
-
Don’t walk backward unless it’s really slabby. Sit fully in the harness and have your hips bent at 90 degrees so your legs are straight and pushing you out from the wall.
-
Don’t wear a heavy pack—that will pull your upper body down. Instead, take off your pack and clip it to your belay loop with a sling so it hangs between your legs. Keep in mind the weight will cause you to move down the rope faster.
-
Be aware of branches, ledges, and anything you might rappel down onto.
-
Pay attention to where your rope is—above and below you. Ropes swinging side to side and loose ends tossed down can cause rockfall.
-
Stay light on your feet to maneuver through chimneys, gullies, slabs, and steep sections.
-
For more, visit climbing.com/rappel-tips.