Published August 22, 2012 01:40PM
Staying Power: Prepare for Grueling Approaches
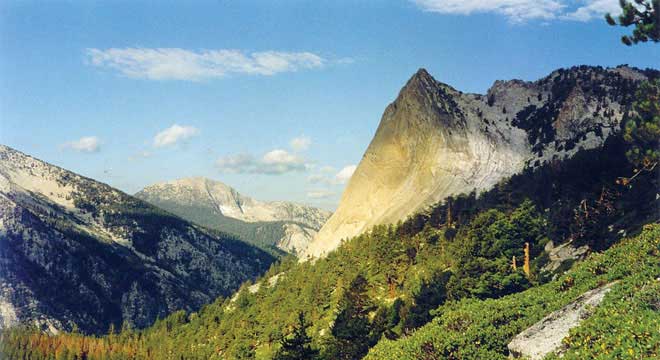
"Beautiful but grueling mountain"

Prepare for grueling approaches in the mountains
Do you aspire to ascend beautiful, sweeping faces like the ones in California’s Sierra Nevada? Are you also put off by long, taxing approaches? You may never be as fit as Galen Rowell was, but with proper training you can build up ample strength and endurance for mountain approaches.
For a training goal, we selected the South Face (5.8) of Charlotte Dome, a Galen Rowell route put up in 1970. It’s the archetypal Sierra route: a 12-mile hike into a nine-to 12-pitch climb, which typically means a three-day trip, carrying all the necessary camping and climbing gear and food.
Courtenay Schurman, a certified strength and conditioning coach and co-owner of Body Results in Seattle, came up with a three-month training program to get your butt in shape for this long Sierra hike. Schurman recommends starting this program only if you’re comfortable carrying a 15- to 20-pound pack for a three- to four-hour hike. If not, take a step back and start with half-day hikes with a daypack.
ADVERTISEMENT
Typical Training Week
Sunday: Rest day or weekly hike
Monday: Strength training (see sample exercises next page), with 15 to 20 minutes of cardio for warmup and cool-down
Tuesday: 45 to 60 minutes of cardio, no pack weight
Wednesday: 30 to 45 minutes of stairs, incline treadmill, or trail running (no pack weight for weeks 1 to 4; add pack for weeks 5 to 12)
Thursday: Strength training
Friday: Rest day or moderate cardio
Saturday: Weekly hike
Weeks 1 to 4
The first month will get you used to up-and-down exercises with minimal pack weight, and prepare you to add pack weight for months two and three.
-
Climb one to two times per week for 60 to 90 minutes, focusing on gear placements and rope handling.
-
Gradually ramp up endurance on weekly hikes, starting with a 3-hour hike in week one to a 4.5-hour hike in week four. Start with pack weight at 15 to 20 pounds, and add no more than 5 to 10 percent more weight per week.
-
Begin cardiovascular training specific to hiking, such as stair climbing, incline treadmill, or trail running.
-
Begin strength training. Include four lower body exercises, two to three upper-body exercises, and two core exercises. Do two to three sets of eight to 10 reps each. (See recommended exercises next page.) Round out lower-body exercises with any variations of squats, lunges, or calf raises.
Weeks 5 to 8
Focus on increasing your endurance with added pack weight.
-
Be comfortable climbing and leading 5.8 terrain.
-
Increase weekly hike length, beginning with 5 hours in week five to 6 hours in week eight. Slowly increase pack weight to 35 to 40 pounds by week eight.
-
Begin midweek pack interval workouts. This means adding a pack to your Wednesday cardio workouts (stairs, treadmill, etc.; see sample workout week above), with the same weight that you carry on your weekly hike.
-
Up your strength training. Include four to five lower-body exercises, two upper-body exercises (one push, one pull), and two core exercises. Increase weight but do fewer reps—do three to four sets of five to eight reps each. Push and pull workouts refer to exercises such as push-ups, pull-ups, rows, shoulder presses, etc.
Weeks 9 to 12
Add back-to-back hiking workouts while carrying a pack to prepare for the consecutive days of exertion on the trip. You’ll also increase the weight of your pack, and you’ll shift your strength training toward building stamina.
-
Be comfortable in your hiking boots and pack, and how you’ll organize your climbing gear.
-
Add consecutive hiking days (i.e., Saturday and Sunday hikes) in weeks nine and 11; use heavier weight on the first day, with lighter weight and more distance on the second day.
-
Increase the weight of your pack for the midweek pack intervals; carry five to 10 pounds more than you’ll be carrying on your trip.
-
Strength training should consist of three lowerbody exercises (including one for calves), four upperbody exercises, and one to two core exercises. Do two to three sets of 12 to 20 reps each. Go for lighter weights and shorter rests to simulate the continuous movements of climbing.
ADVERTISEMENT
Recommended Exercises
Hip thrusts (start)

Hip thrusts (finish)

Hip Thrusts: Strengthens glutes, hamstrings, lower back, and core.
Start with a sturdy, padded 17-inch workout bench. Rest your shoulders and upper back on the bench, arms flat, with legs in front and knees bent. Begin with hips low and adjust feet to be slightly wider than hip distance apart. Squeeze glutes to lift your hips high into tabletop position so thighs are parallel to the floor. Lower your hips as far down as you can, and then contract the hamstrings and glutes to come back up to five-degree hyperextension (slightly above tabletop), working the glutes through their entire range of motion. Squeeze the glutes together and pause slightly at the top of the movement. Repeat. For a more difficult variation, set a pair of dumbbells on the hips; start at 12 pounds and increase weight after each set until it’s an ideal challenge for you.
ADVERTISEMENT
One-legged dead lifts (start)

One-legged dead lifts (finish)

One-legged Dead Lifts: Develops balance in ankles, knees, and hips for hiking on rugged terrain, scree slopes, and boulderfields. Builds glutes for uphill power and speed.
Stand balanced on one foot with a dumbbell in each hand. Keep the other foot in the air but near the floor, in case you need to touch it down for balance. Bend down to touch the floor with as much or as little knee bend as is comfortable for you. Most of the flexion will be through the hips, rather than at the knee. Exhale as you lift back up to standing. Repeat on other side.
Reverse step-ups (start)

Reverse step-ups (finish)

One-leg Reverse Step-ups: Helps develop strength in the quadriceps for descents.
Start with a step height of six to eight inches (going up to, but not more than, 12 inches). Stand on one foot in front of the step, facing away, with the other foot on the step, toes turned out about five to 10 degrees. Slowly step backward and onto the step, lowering heel to the step. Make sure the leg on the step is doing the lifting—don’t push off with the leg on the floor. Then reverse the movement and slowly lower back to the floor. Repeat. For each rep, take two seconds to lift, and two seconds to lower. For a variation, wear a backpack or hold two dumbbells to simulate the weight you’ll carry when hiking.
ADVERTISEMENT
Seated Medicine Ball Oblique Twist (not pictured): A strong core assists in getting into and out of a heavy pack, successfully maneuvering through overhanging positions on rock routes, and maintaining upright posture for hours of travel.
Sit on the floor with knees bent and feet flat on the floor, holding a medicine ball in front of you. The farther back you lean, the harder your abdominals and obliques have to work. Keep your abdominals tight in order to protect the lower back, and twist your torso slowly to the right, touching the ball to the floor. Then turn 180 degrees and work the opposing obliques, touching the medicine ball to the floor on the left. Repeat.