Tech Tip - Big Wall - Copperheading

"Tech Tip - Big Wall - Copperheading"
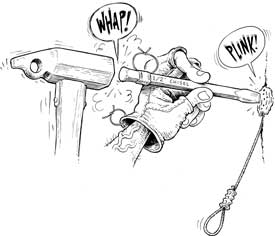
A chisel (with a keeper loop) is ideal for pasting head material against stone.

Copperheads are a quintessential foundation of granite aid climbing, and my favorite modern-aid-climbing tool. Every aid climber should know how to engineer a copperhead placement, even if it’s just to replace the odd one that rips out on a Yosemite trade route.In-situ heads. If you don’t like falling, treat every fixed head with suspicion. Sure, you just watched a party yard off it, but that doesn’t mean it won’t blow on you. If you’re in a hurry, you can test a fixed head with several quick stamps of your foot on an etrier that’s clipped into the piece. Realize, though, that this method doesn’t create much of a shock load; it’s best to give fixed heads a full bounce test.Excavation. If the head does rip, more often than not it’s the wire that snaps, leaving the head material embedded in the rock. Using your hammer and chisel (if you don’t have either, consider yourself well-screwed), dig into the sides of the placement, peeling the head material away from the rock. Once you’ve got the broken head peeled back, hit the chisel hard on the top and bottom of the head. Repeat until the plug pops loose.Prep work. Before putting your new head to the rock, clean out loose debris (a blow tube works well). Next, decide what head size to use. Heads come in different sizes, from one to five, and are made of either copper or aluminum. Either material will work, although I prefer copper for the smaller heads (#1s and #2s), because it’s a harder metal. Aluminum heads are easier to paste, and may offer better small-crack penetration. Experiment. You’ll typically be using #2s and #3s, but #1s and #4s are also occasionally useful. If you’re replacing a ripped head, you’ll typically use the same size.Sculpting. If your intended placement pod/slot has a natural taper, you’ll need to shape your head. Lay the head against the rock and hammer on its bottom; this adds a nut-like taper. This technique works beautifully in constricting placements that are too flared to hold a nut.
A center punch is useful for firing head material into a pod or crack.
Placements. When fitting the head to the rock, make note of where the cable enters the head — you want the folded-over side of the head facing outwards, thus reducing the chance of chopping the wire when hammering. While the standard practice is crosshatch an “X” pattern into the head with a half-inch chisel (make sure to slightly round the chisel’s edge or you’ll chop the head to bits), I prefer to use a center punch with a rounded, one-eighth-inch head (dedicated aid aficionados carry a selection of different chisels and center punches). Start by firing straight back with the punch, trying to pound as much head material into the back of the placement, while being careful not to damage the wire. This creates maximum holding power. Before I begin pasting (smearing the head material against the sides of the pod) the sides of the head, I give it a gentle tap on top with the center punch to see if the head pivots. If it moves at all, it’s junk, and you need to keep firing more material into the back. Once a head passes the pivot test, I switch to a chisel and work on pasting the material outwards against the sides of the placement. Final exam. When you think you’ve pasted the head as much as possible, give it a second pivot test. If it doesn’t move, you’re ready to give it a full test. In addition to the above-mentioned bounce test, you can test heads with a funkness device. Keep a firm grip until just before the funkness comes tight, then loosen your grip as you come to the end of your stroke, as you don’t want to static shock load your arms/wrists/hands. This method really only works on #2s and up, as #1s are so fragile that the wire will snap with even the lightest tug. It will take some time for you to get a feel for how hard to rip. I’ve found that a well-placed #2 or #3 can take a forceful yank. I’ve broken biners while testing #3s — an indication that just because it’s a copperhead, doesn’t mean it’s dicey.Parting note. Copperheads work well in expanding cracks because they typically don’t flex the rock. Conversely, heads are likely to rip if the crack is expanding and you inadvertently open it (e.g. pounding a pin). If you’re standing on a head and are considering nailing in a pin for your next placement, you better be darn sure that the crack doesn’t expand.Senior Contributing Editor Mark Synnott is an independent guide operating in New Hampshire’s White Mountains. You can visit his website at www.synnottmountainguides.com.