Tech Tips - Sport - Hands down

"Tech Tips - Sport - Hands down"
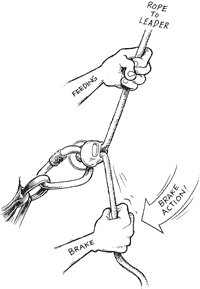
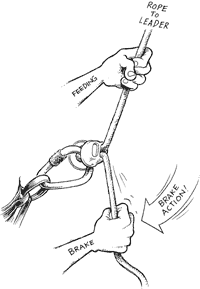
Figure 1. Brake in the normal manner

Hands down — teach a better belay
It’s a spectacular autumn day at Colorado’s Penitente Canyon, the air crisp and clear, dark-blue sky stretching to the horizon. Arriving in the canyon, you drop a rope down Mr. Breeze, a well-bolted 5.2 beginner route. The route is perfect for your buddy, Bubba, an athletic novice, and easy for you — an important consideration, as you’ll be using it to teach Bubba how to belay. As you climb the friendly slab, you constantly remind Bubba not to release his brake hand. He doesn’t seem to be getting it. At the top, you drop the rope and scramble down: There’s no way you’re leaning back on that belay. For 25 years I used and taught the classic “pinch” method of belaying: hands on rope palms up and pinkies toward the belay device, draw in rope; slide the feeding hand up and pinch both ropes; and recover the brake hand to the starting position. For 25 years I experienced frighteningly poor early results, just like with Bubba. Last summer, while working for Mountain Adventure Seminars in Bear Valley, California, I taught several climbing courses with K.C. Baum of the American Mountain Guides Association Technical Committee. He recommended that I start teaching a more reliable, easier-to-master belay: the “hands-down” method. One demo and I was convinced — this is a better belay to teach, especially for toproping.
Figure 2. …then move your feeding hand down to brake…
The sequence is simple. Holding your brake hand palm-down with your thumb toward the belay device and your feeding hand in its traditional palm-up/pinky-toward manner, pull in rope in the usual, hands-in-unison fashion. At the end of each stroke, immediately pull your brake hand back down to the brake position (Figure 1). Now move your feeding hand from the climber’s side of the rope to the brake side, grasping the rope just beyond your brake hand, where it serves temporarily as a back-up brake (Figure 2). Next, slide your brake hand back up the rope (Figure 3). Return your feeding hand to the starting position, and repeat the sequence. Many students find it helpful to repeat the mantra: “Pull — brake — switch — slide.” There are several advantages to this technique: It employs an instinctive palm-down braking position; it makes it difficult for a belayer to pinch both ropes with the brake hand, a common mistake in the “pinch” method; it eliminates the problem of a belayer extending his brake hand beyond his feeding hand, forcing him to remove the brake hand on the recovery (another very common mistake); and it keeps the brake hand in a good position for confident lowering. When taking in rope, students will sometimes make the mistake of pulling rope laterally from the belay device with their brake hands. This, of course, activates the device and causes a great deal of friction. To remedy this, instruct students to move their brake hand toward the toprope anchor, rather than to the side, when recovering rope, and remember that this system is indicated for toproping only. The hands-down method is all I use and teach anymore, and I’m told it’s gaining popularity with gyms and climbing schools. First-time climbers and grizzled mountain guides alike can benefit from this simpler, more foolproof belay.
Figure 3. …and slide your brake hand back up.
