Published March 14, 2017 02:56AM
Learn This: Belay Extensions
Improve multi-pitch communication by adjusting belay position
"None"
“Off Belay!” “What?” “I said, ‘Off Belay!’” “What?!” This miscommunication between climbers occurs frequently on routes with long or traversing pitches. The best way to prevent these problems is to extend the belay from the anchor, so that the belayer can be next to the edge. When you can see the other climber, belay commands become easier to relay. Follow these tips to help get a clearer view of your partner.
The Solution
When most climbers arrive at the belay on a large ledge, they build an anchor, then clip into it with a short tether. While this sounds correct, it can put you too far from the edge to see or yell to your climber below. The solution to the miscommunication problem is to extend the anchor. There are three systems to extend an anchor: estimated extension, pinpoint extension, and the extended master point. All three systems require using the rope. Start by clove-hitching into the anchor with the climbing rope, which provides more flexibility than using a personal anchor system, a Purcell prusik, a daisy chain, or a limited-length tether. Practice the following methods when you’re close to the anchor and don’t actually need them. This will help you develop better familiarity and competency with them.
Estimated Extension System

The simplest way to extend the anchor is to estimate the distance to the edge and then clove-hitch the rope into the anchor with the requisite slack between you and the anchor. After clipping in, double-check the length by moving to the edge and noting the amount of tension in the line. Adjust the rope as needed and set up your belay directly off the anchor with your auto-blocking belay device (fig. 1). Return to the edge and let your climber know he’s on belay.
ADVERTISEMENT
There are a few potential issues with this system. The first is that you may have to make several adjustments to get the length right. The issue is that if there is treacherous terrain between you and the edge, moving to the edge could be dangerous and not well-protected. The last—and potentially largest problem—is that you won’t be within reach of your device to make adjustments or provide slack when needed. However, this tends to be the fastest system. Additionally, the more you do it, the better you’ll be able to estimate the length and have the system set up quickly.
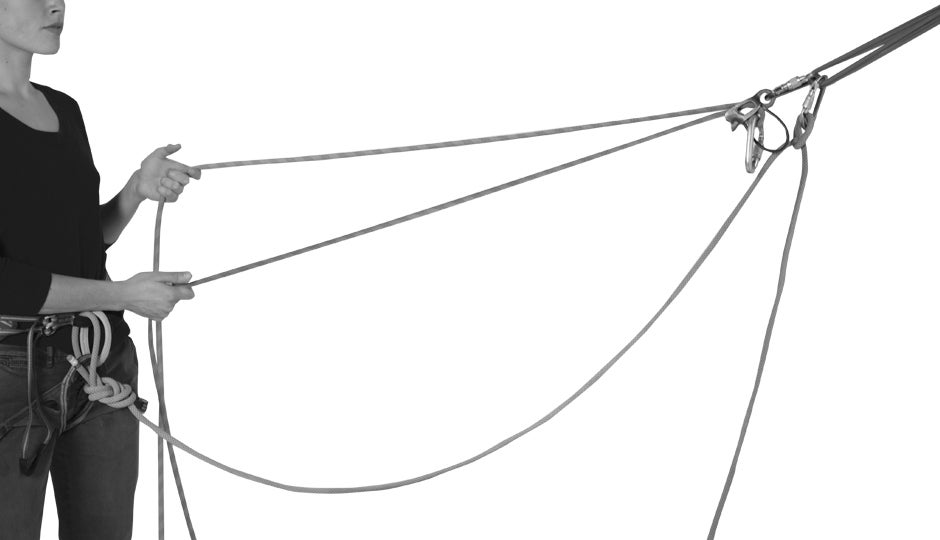
Pinpoint Extension

The second system requires that you build an anchor and then clip a locking carabiner to the master point. Clip the rope coming from your harness through the master-point carabiner, lock it, and then walk to the edge of the cliff. Once you reach the edge, clip a second locking carabiner to your belay loop and clove-hitch the backside of the rope into the second locking carabiner and lock it. The rope will be running from your harness, to the anchor, through the carabiner, and back to your belay loop, where it’s clove-hitched to another locking carabiner (fig. 2).
This system offers precise extension. Unlike the first system, you will not have to walk out to the edge and then walk back to adjust your clove hitch. Instead, you will only do it once. However, like the first system, you won’t be protected moving from the anchor to the edge. Like the estimated-extension system, you will belay directly off an auto-blocking device on the anchor, and you will be too far from the device to give slack or lower the climber quickly.
Extended Master Point

This final system protects both the climber and the belayer when there is difficult terrain between the desired stance and the anchor. To construct this system, build an anchor, then place a locking carabiner on the master point. With the rope coming from your harness, tie a Munter hitch to the locker and lock the carabiner. Once complete, hold the backside of the rope and belay yourself out to the ledge with the Munter. This will provide security for steeper, more difficult terrain.
ADVERTISEMENT
At the stance, take the strand between your harness and the anchor and the backside strand, and tie a BHK (double flat overhand on a bight; BHK stands for “big honkin’ knot”). This knot will become your new master point (fig. 3). Belay directly off this using your auto-blocking device.
When the climber arrives at the belay, the belayer will tie a stopper knot behind the auto-blocking device. She may then pull on the strand between the BHK and the anchor. Use the Munter on the upper anchor to provide a belay for both the climber and the belayer as you scramble up. Make sure to keep a hand on the Munter at all times to ensure the belay. Once both parties have reached the anchor, clip directly into it.
The extended master point provides a solution for difficult or dangerous terrain between the anchor and the belay stance. However, escaping the belay becomes more complicated. Plus, the transition out of this system and into the anchor for the next pitch will be sloppy until you’ve practiced this technique several times.
Radios and Rope Tugs
Climbers sometimes employ radios or rope-tugging tricks to pass commands back and forth. Radios tend to be problematic. First, the batteries might die. Second, people use them as a crutch to tell their partners everything. This additional chatter makes it harder to communicate when something goes wrong. Rope tugs can work, but should be used sparingly. To avoid miscommunication, discuss what tugs mean prior to leaving the belay.

Red Rock Rendezvous, march 24–27, 2017. Boost your safety and build skills like this one during this three-day celebration of the climbing life. Party with your heroes and scope out the latest gear from the industry’s best. Learn more and register now at redrockrendezvous.com.